Friday, April 27, 2012

Fun with Felt

Today was a great day to play with felt.  In preparation for my daughter's Tangled birthday party we made some cute hair clips and a headband.  Additionally we made some fun Flynn Rider belts for the boys who will be attending the party. 

With the wind blowing through her hair, my daughter felt just like Rapunzel.  
 I saw these fun hair ties on the Disney Family website and decided I wanted to create similar clips for my daughter's Tangled party.   Here are the steps I took to make these adorable rosebud hair clips. 

Supplied needed;
- Hair clips or Head band (I purchase mine at Micheal's)
- Felt strips cut 1 x 5 inches (3 per clip)
- Felt leaves cut per template found at Disney Family (2 per clip)
- 3 strips of Ribbon cut approximately 18-24 inches.
- Hot Glue Gun
 1.  Fold felt strip in half and glue together. 
 2.  Start to tightly roll felt strip up, glue as you roll to hold rose bud together.  Be careful not to burn your fingers. 
 Display with folded side up.  Don't all those little roses look cute and whimsical? 
 3.  Glue three ribbons on the clip as desired. 
4.  Glue leaves on top of ribbon. 
5.  Glue three rose buds together to form a cluster, then glue cluster on top of leaves. 
 **If you are making a head band.  Cut an oval out of the felt and glue around the head band in  the desired location.  This makes for a sturdier base to glue all the parts onto.  
The hair clip is so cute.  Think the girls will feel just like princesses wearing these. 
 The headband is cute too and perfect for the birthday girl. 
 There will also be several little boys at the party, so not to leave them out or embarrass them with hair clips, we made a very simple Flynn Rider belt. 
Supplies
-Dark Brown Felt from a ream
-Tan Squares of felt (cut 3 x 4 inch rectangles with a 2 x 3 inch rectangle cut out of the middle)
-Velcro
-Hot Glue Gun

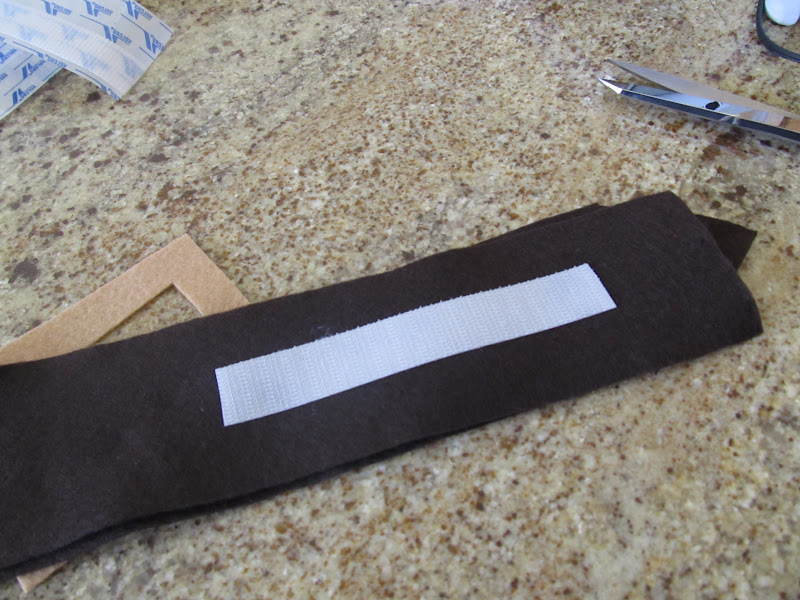
1. Cut 2 1/2 inch strips of brown felt for  belt.  Cut in half or to desired length.
2. Cut a point on the right end of the strip. 
2.  Cut out belt buckles from tan felt.    
 3.  Place 3-5 inch strip of hard Velcro (not the soft side) on the left hand side of the belt.  There is no need to attach the soft strip of Velcro.  It will adhere to the felt on it's own.
4.  Glue the belt buckle approximately 4-6 inches from the pointed end of the belt (i.e. right side).
 Such an easy and cute belt.  Perfect for any young Flynn Rider. 
We are all eagerly awaiting the fun Tangled/Rapunzel party and will post more of the festivities next week. 

~Amy

Monday, April 23, 2012

So Happy!

This bright and cheery bathroom was the inspiration photo for this week's Heart 2 Heart Challenge.  I love the brightness of this picture as was inspired by the colors and pretty flowers on the shower curtain.  
 While creating this card, I wanted to add some pink to it, but was liking the simpleness of the orange and green papers on Close to My Heart's  Kraft Die-Cut Cards.  I additionally used this month's promotional papers, "Dotty for You" (purchase for only $5 dollars with an order of $35.00 or more) and CTMH's Baker's Twine.
 Can't wait to make someones day with this pretty little card. 

Thanks for the inspiration Heart 2 Heart!

~Amy

Window into My Heart

This weeks Mojo Monday Sketch reminds of a window pane.  It is simple with lots of possibilities.  
 By using a single sheet of  B&T paper from Close to My Heart's "Dotty for You" paper pack, and mounting the 9 frames on a "smoothie" piece of card stock, I was able to get the desired look I wanted for my card. 
I am tempted to try this design with a variety of different papers to get more of a patchwork look.  Who knows, I may have another entry this week. 

~Amy

**Remember, the "Dotty for You" paper pack may be purchased for $5 when you place an order of $35.00 or more from the current Close to My Heart Idea Book.

Sunday, April 22, 2012

May's Scrappy Creations Class

May Scrappy Creations Class
Thursday, May 10th @7PM
This month you have two choices, create a layout, plus 5 cards or simply create 10 cards. 
Here is a a close up of the layout.  Great for masculine or outdoor/"woodsy" photos. 
  The cards are simple yet classy and would be perfect for Father's Day. 
We will be using the following products in May:


Please let me know if you would like to attend this class no later than Friday, April 27th.  Make sure to let me know which Kit you would like and if you would like to make the layout, plus cards, or just the cards.   
Workshop on the Go (Includes all supplies plus the My Acrylics Stamp Set)- $35.00
Kit 1: (Paper pack)- $11.63
Kit 2. (Paper pack, Studs)- $15.17
Kit 3 (Paper pack, Cork Shapes)-$15.17
Kit 4 (Paper pack, Studs, Cork Shapes)-$20.86
**Please note, if you choose to purchase Kit 3, and would like to share the studs with others in the class, I will add $1.50 to your order.  By choosing this option, you will not have any studs to bring home for extra projects.

Looking forward to another great class!

~Amy 

Wednesday, April 18, 2012

Chicks Dig It!

The new "Dotty for You" papers from Close to My Heart are so cute and springy, I couldn't resist pairing my card with my pretty hydrangas and cute little chick.  Check out the card's I created using Mojo Monday's sketch, while also incorporating some stitching for the Heart 2 Heart Challenge.   
 This simple "Thank You" card was created by stringing banners on CTMH's baker's twine and then mounting them on a neutral "dotty" B&T. 
 You can get a totally different look by simply changing your banner colors and/or the color of the baker's twine.
 This weeks Heart 2 Heart Challenge was to incorporate stitching.  I love the detail stitching adds to a project, but usually overlook it because of the simplicity of using glue.  I am much more likely to create stitching lines with a pen, stamp a stitched line using the "Sew Happy" stamp set or sand an embossed line and puncture holes onto it to create a faux stitched line.  This week I decided to using baker's twine to stitch a banner together.  By poking holes in top corner of each banner I was able to string or "stitch" the banner togeter.  It was super easy and quick, because all I had to do was attatch the two ends of the twine to the back of the the grey dotty paper.  The banner hangs nicely on the card and even has some movement.  No glue on the paper also enables you to see the inside of the banners for even more color.  I really liked how it turned out.   
Make sure to take advantage of Close to My Heart's, National Scrapbooking Month promotion.  Purchase $35 dollors from the Spring and Summer Idea Book and receive the exclusive "Dotty for You" paper's (featured on my card) for only $5.

~Amy

Monday, April 16, 2012

Dotty for Scrapbooking!

Did you know May is National Scrapbooking Month?  Close to My Heart is giving you two extra weeks to celebrate by offering the beautiful "Dotty for You" Paper Pack for only $5 with a qualifying order of $35.00 from the current Spring and Summer Idea Book.  This paper will be available , Tuesday, April 17 -May 31st--or while supplies last.  Don't miss out on this great value.  2 pages of 12 different patterned papers totaling 24 pages for only $5.  Wow, that is practically 75% off the retail value!  Start your shopping here.   
From now until the end of May, I too will be celebrating National Scrapbooking Month, by featuring a variety of different projects using the "Dotty for You" papers.  I plan to post as least one project per week.  Hope this get your creativity flowing! 

My first project is a 9x9 Memory Showcase Album I created for my sister's new baby girl, Grace.  These Memory Showcases are available in the "While Supplies Last" section of my website and are a great value for only $3.00.  Make sure to check out the other clearance items for sale while you are there.  Both the 9x9 and 6x6 Memory Showcase Albums make great gifts.  Think, baby gift, Mother's Day gift, wedding gift, teacher gift; you name it, this would make a nice, thoughtful and easy gift for anyone. 

Front Cover:


 Back Cover:

I love how clean and simple this album turned out and can't wait to see sweet Grace's pictures don it's pages. 

Happy Scrapping!
~Amy


Footloose and Fancy Free

I just had a great "Scrappy Creations" class last week, where we created the cute mini-album seen here.  Here are a few additional cards and a layout I promised I would share. 

I didn't have any cute seaside or summery stamp sets, but as you can see, using the remaining chip board complimentary elements and the zip strip words from the top of the B&T paper, I was able to create a fun and simple card.
 No stamps here either.  I just cut out a sea star and sand dollar from the B&T paper and stamped "beach" using the small Typeset Alphabet on the Color Ready Cork Shapes.  So simple yet cute. 
 I love this fun summer layout out.  Don't the bright swimming pool photos look great with this layout?  Footloose papers are perfect for any outdoor summer time photos. 
Remember, if you would like directions and cutting guide for my "Scrappy Creations" mini-album class, please order one or all of the following items from my website; Footloose Paper Pack, Footloose Complimentary Elements, or 6x6 Memory Showcase
~Amy

Friday, April 13, 2012

Which Way to the Beach?

Yes, it is Friday and I am just getting around to posting my card for this weeks Mojo Monday Challenge, but I haven't participated in a challenge lately, so I thought I better get with it. 

Here is my interpretation of this week's scketch using Close to My Heart's Footloose Paper Pack.  I love the bright colors and simple "beachy" patterned papers.  One of the papers even had the cute sand doller and starfish I could cut out and use as an embelishment for the arrow.  Additionally I used CTMH's Color Ready Cork Shapes as well as a simple hemp strand and knots.      

Now if there were truely was a beach nearby, I would be set. 

Enjoy!
~Amy

Sunday, April 8, 2012

Happy Easter!

Just a quick post today with a fun spring/Easter treat.  By simply coloring coconut green and sprinkling on the top of a frosted cupcake, then adding candy eggs (cadbury, chocolate candy coated or jelly beans) you can create a cute spring nest. 
This has been a favorite treat of mine since I was a child and my Mom use to make these for me to bring to school for my birthday. 
 They looked festive this morning grouped together on a cake stand.  The children at our Easter brunch loved them. 
Enjoy!
~Amy